
Replacing Floor Vents in an Old House: Matching Odd and Vintage Sizes
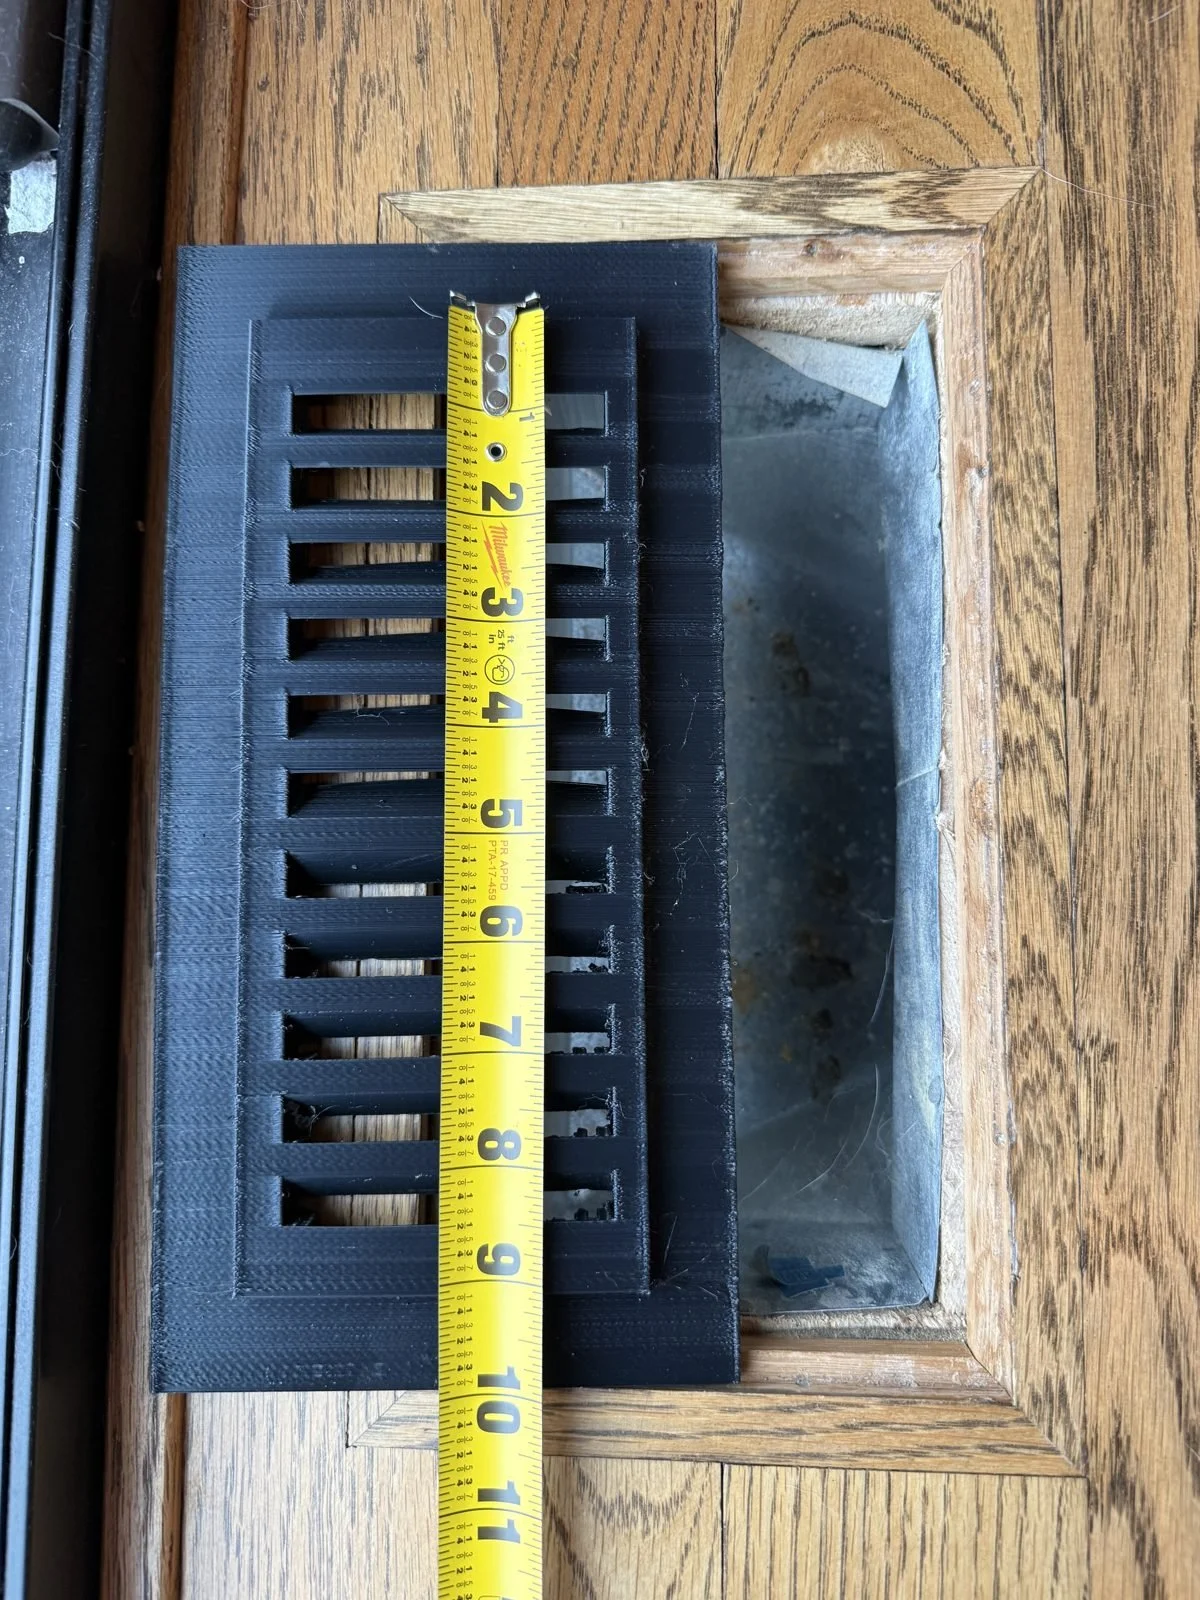
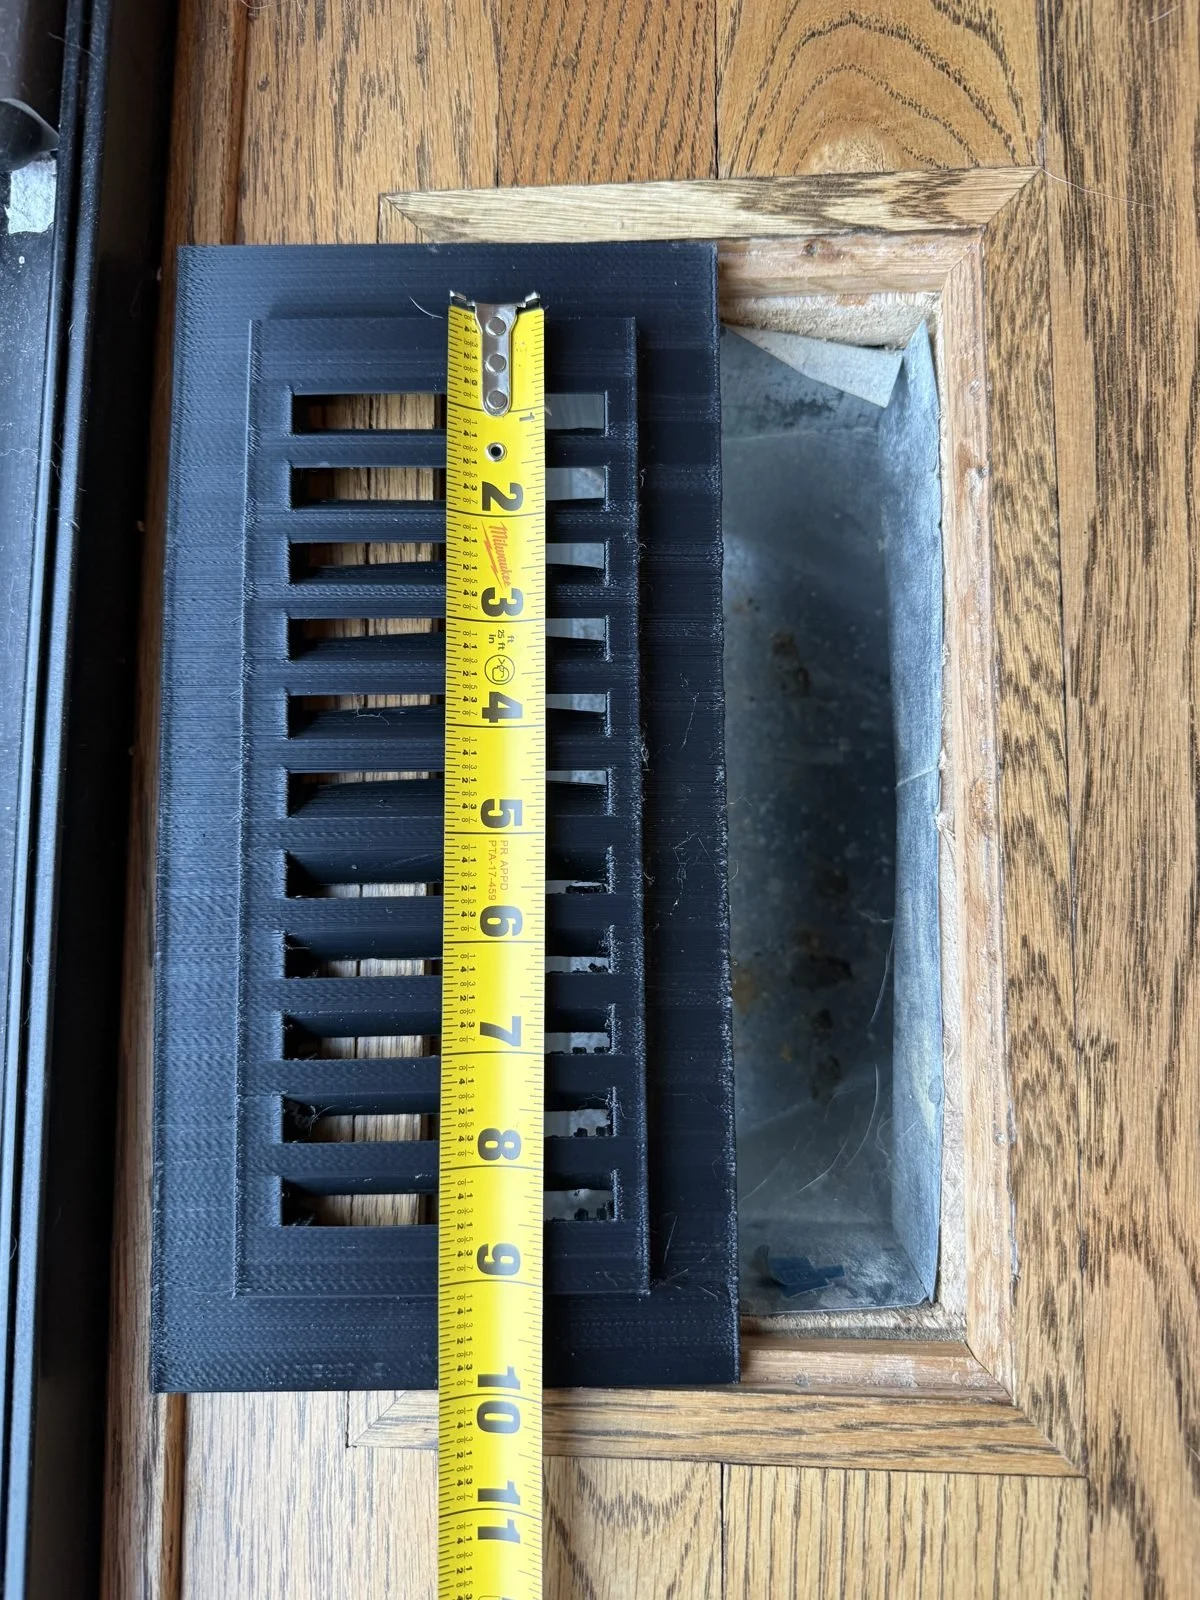
Old houses have character, and they also have floor vents that no store seems to carry. Openings get cut to whatever the original builder needed, then get recut every time someone replaces the floor.
Why old-house vents are so often odd sizes
- Ductwork predates today's stock sizes. Openings in older homes were often cut to fit the framing and ducts of the time.
- Heating systems change. A home may have gone from gravity heat to forced air, with openings added or resized along the way.
- Floors change. New hardwood, tile, or subfloor layers change the opening size and the depth below the surface.
- Wear and tear. Decades of use chip edges, and damaged subfloor can shrink or distort the usable opening.
Before you shop, measure each opening individually. In an old house, two "matching" vents in the same room may differ.
Step 1: Inventory and measure every vent
Walk the house and list each vent:
- Location (room and spot)
- Supply or return? Supply vents blow air out; returns pull air back. Returns are often larger.
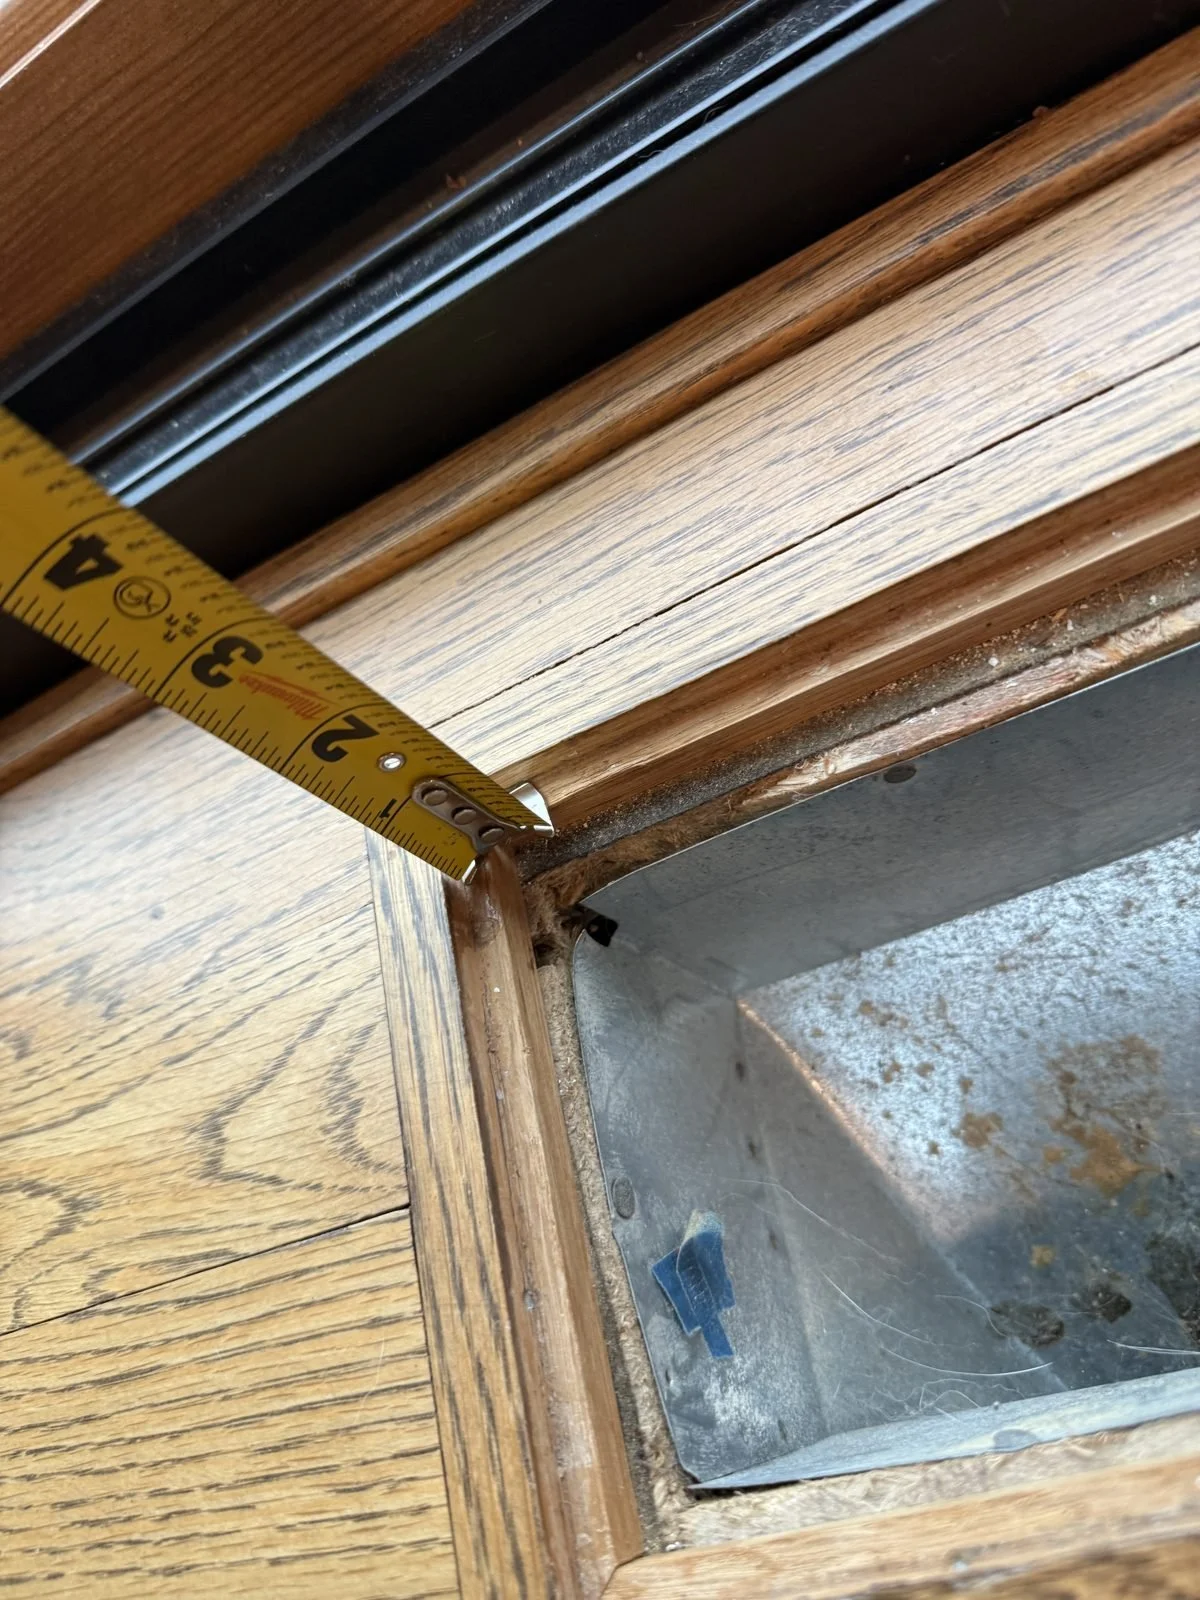
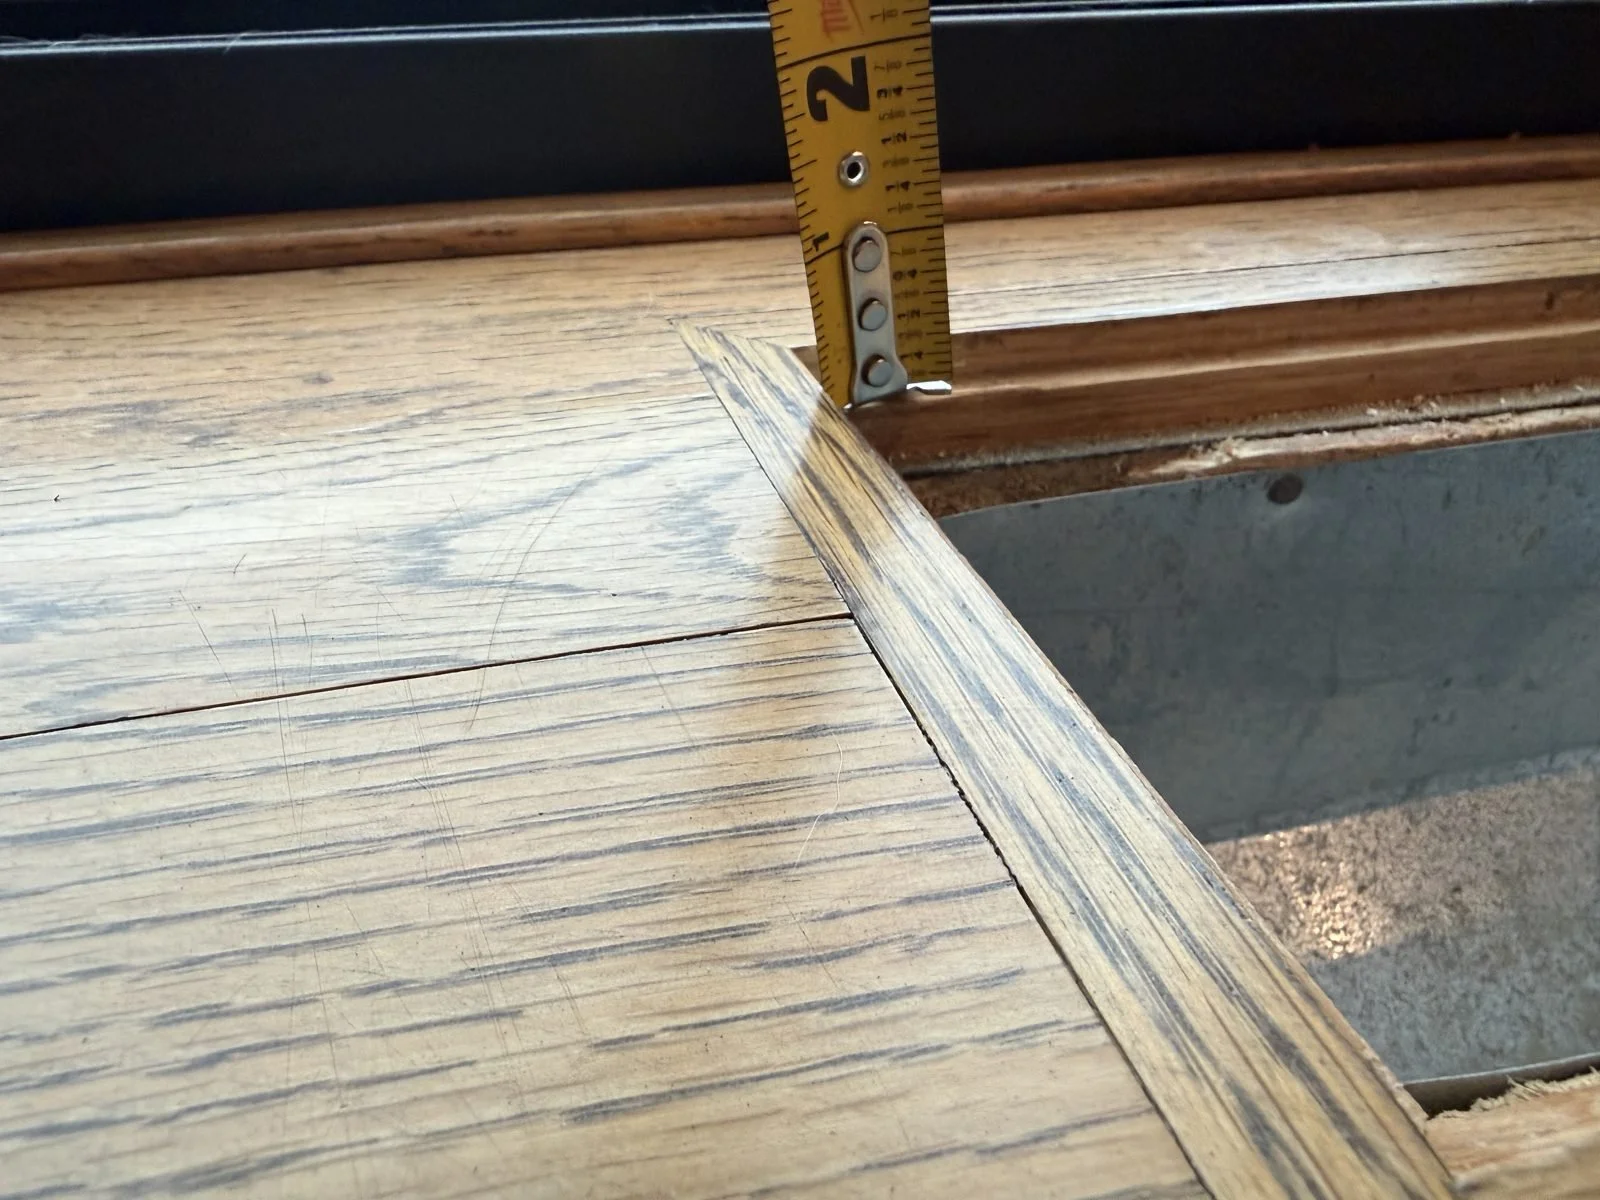
- Opening width × length, measured inside edge to inside edge, twice in each direction (see How to Measure a Floor Register)
- Traffic level: walkway, along a wall, or under furniture
- Photos of each opening and the existing cover
This list tells you which vents can use stock sizes and which need custom work.
Step 2: Choose the right replacement for each spot
Architectural salvage
Salvage yards and online listings sometimes have original cast-iron or brass grilles. Salvage can look authentic, but finding the exact size is hit or miss, and old grilles may need cleaning or refinishing.
Custom metal or wood registers
Specialty makers produce registers to custom sizes in steel, brass, aluminum, or wood. These are the right call for large openings, floor returns, and anything in a walkway. Large old-house returns can be big enough that a weak cover is a real safety hazard. Expect a longer lead time and higher cost than stock parts.
Custom-size 3D printed registers
We make custom-size 3D printed floor registers from a few key dimensions you send us, starting at $35, with about 1–2 weeks of production time. In an old house, they're a practical fit for:
- Smaller supply vents in odd sizes that stores don't carry
- Low-traffic spots along walls, under radiator covers or furniture, or in closets
- Interim fixes while you hunt for the perfect salvage piece
- Color matching: black, white, any color you choose, or glow-in-the-dark
Because it's plastic, our register will likely be weaker than metal, and we don't recommend direct loading. Don't use it for large openings or vents in the middle of a walkway. It's printed in PLA, which should handle what home floor supply vents put out, and it can be up to 6" wide (best at 16" long or less).
Can you copy my vintage grille pattern?
Yes. We can duplicate vintage and decorative grilles using photogrammetry or our CAD designers, then print the copy. Keep your old grille, even if it's broken, and contact us with photos.
Step 3: Check the fit and airflow
- A register should drop in without forcing and sit flat on the floor.
- Make sure the duct below is clear; old ducts collect debris.
- If your old vent had a damper to control airflow, decide whether you need one in the replacement. Our 3D printed registers don't include dampers or louvers.
Old-house tips
- Don't recut original floors to fit a stock register unless you're sure. Recutting can't be undone.
- Label your measurements by room, since many old-house openings are one-offs.
- Keep the old cover, even if it's broken. It's a useful reference for size and style.
FAQ
Are odd floor vent sizes normal in old houses? Yes. Older ductwork and decades of renovations make non-standard openings common.
Is a plastic register safe in an old house? For small, low-traffic vents, yes. For large returns or walkways, use metal; we don't recommend direct loading on our plastic registers.
How long does a custom register take? Ours take about 1–2 weeks to produce. For a rush, contact us.
What if my opening isn't rectangular? We currently make rectangular floor vents only. If yours is round or oddly shaped, reach out and we'll see what we can do.
Fix the odd one out
Measure your opening and order a custom-size floor register, or send us photos of a tricky old-house vent and we'll tell you whether it's a good fit.
Related:
Floor Vent Sizes Explained: 2×10, 4×10, 4×12, 6×10… and the Odd Ones
Floor vent sizes look simple, two numbers like "4×10", but they trip up a lot of buyers. Here's what those numbers actually mean, which sizes are common, which are odd, and what to do when your opening falls between them.
What does "4×10" mean?
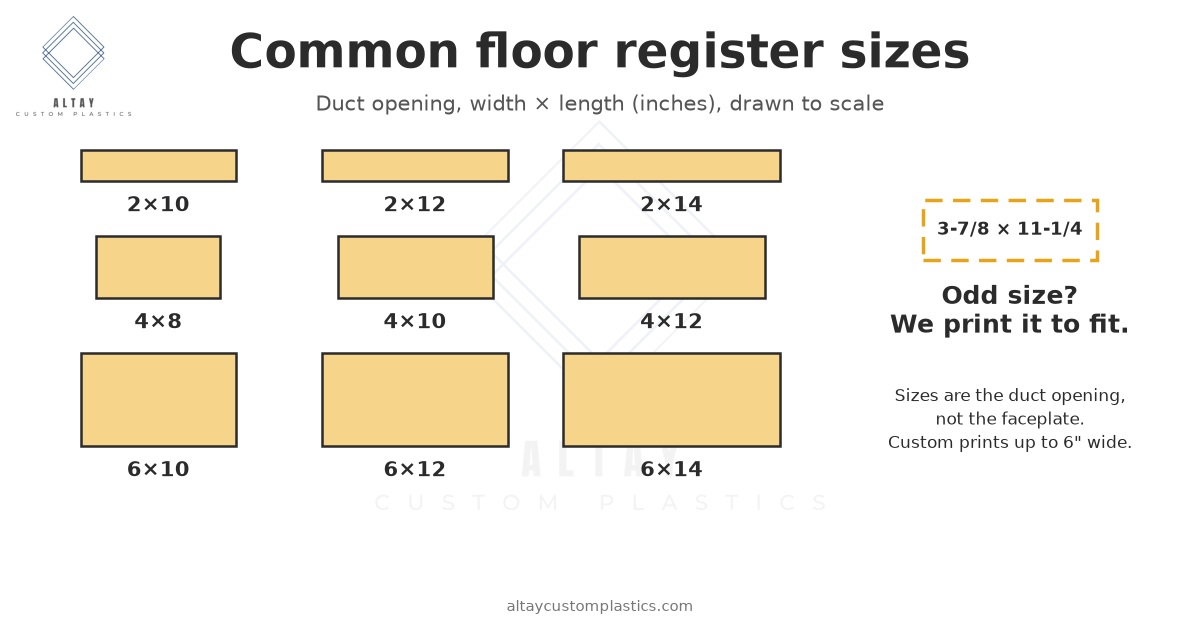
A floor register's size is the size of the duct opening it fits, in inches: width × length. A 4×10 register fits a hole about 4" wide and 10" long.
What it does not describe is the faceplate. The decorative top of the register overlaps the floor on every side, so it's always larger than the listed size. That's why measuring the top of your old register will mislead you. See How to Measure a Floor Register.
Common floor register sizes
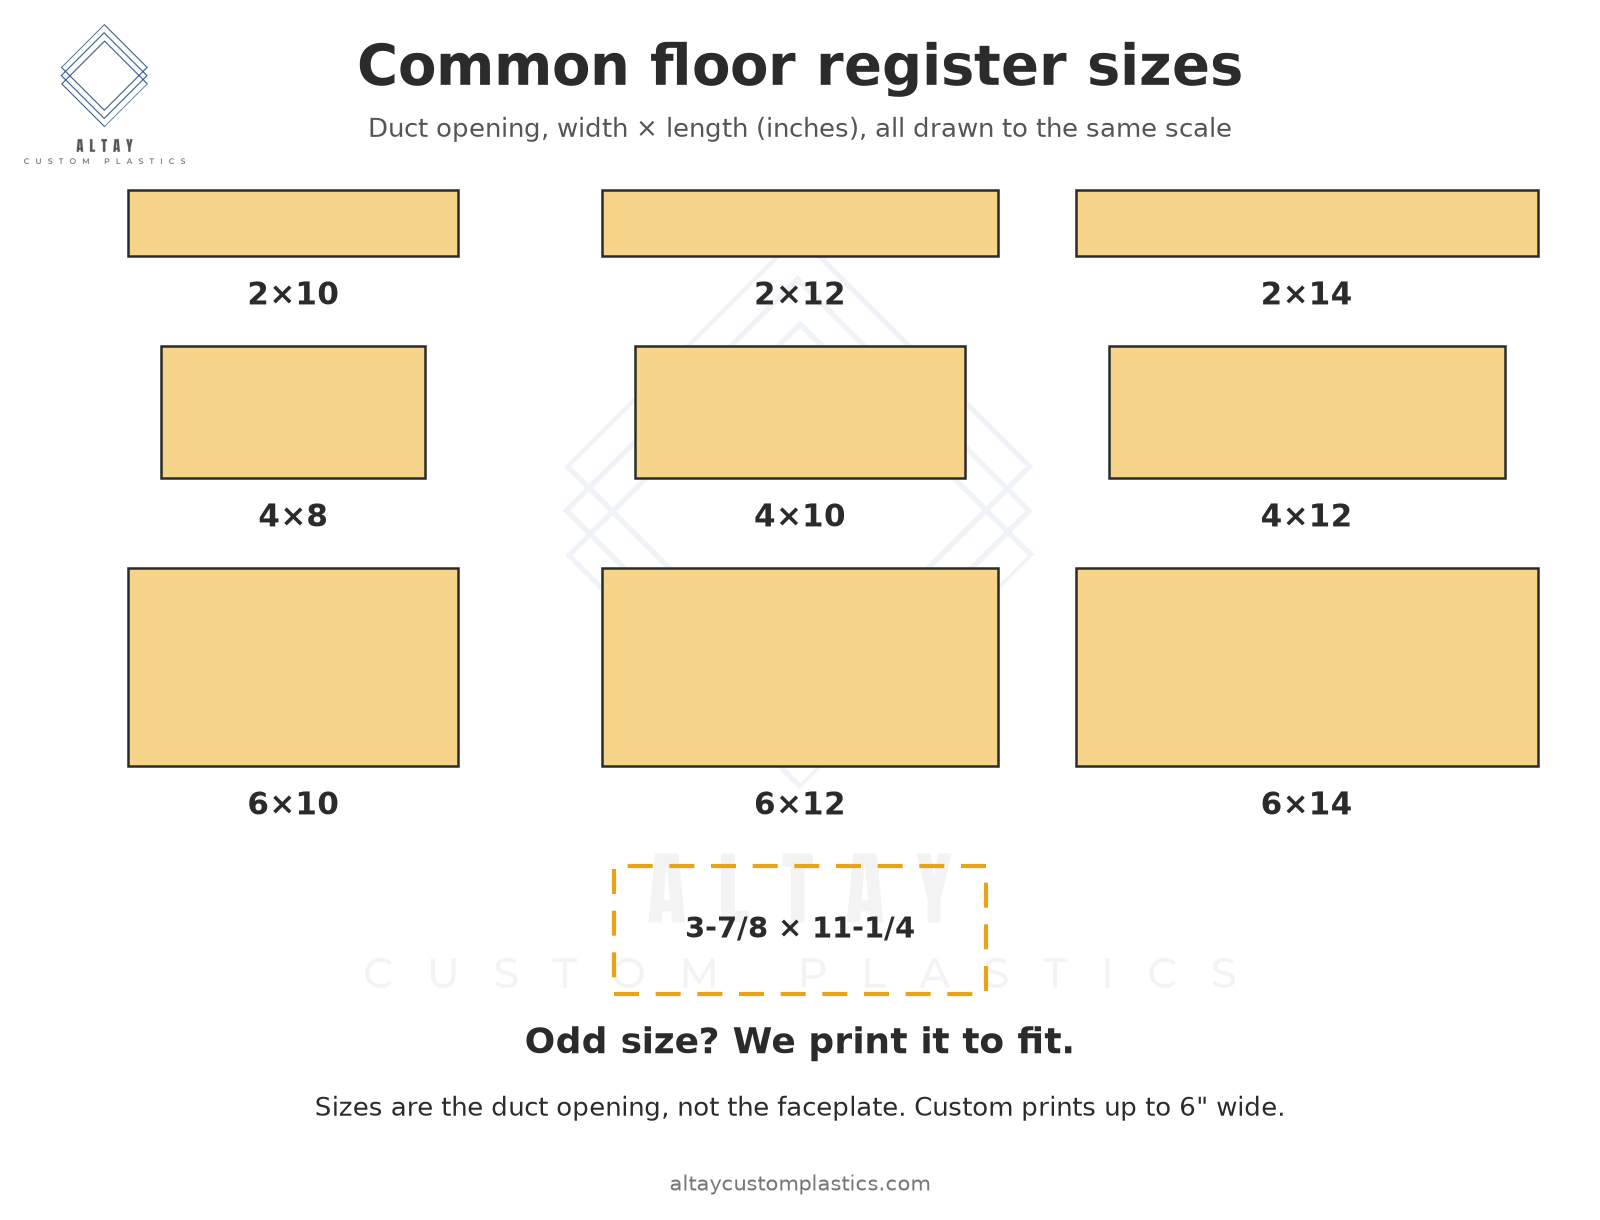
These sizes are widely stocked at hardware and home stores:
| Size (opening) | Where you'll often see it |
|---|---|
| 2×10, 2×12, 2×14 | Narrow vents, often along walls or in tight spots |
| 4×8 | Smaller rooms and supply runs |
| 4×10 | One of the most common residential sizes |
| 4×12 | Common residential supply vents |
| 6×10, 6×12, 6×14 | Wider supply vents |
| Larger (8×, 10×, 12×) | Often returns, or larger rooms |
If your opening is one of these, a stock register is usually the cheapest and fastest fix.
Odd sizes stores rarely stock
Anything outside the common sizes can be hard to find locally. Examples include:
- 3×10 and other in-between widths
- Fractional sizes like 2-1/4", 3-1/2", or 4-1/4" widths
- Unusual lengths like 9", 11", or 13"
- Large or square openings (e.g. 8×10, 10×12), often returns
- Openings recut during renovations to whatever fit the job
Older homes and renovated floors are the usual sources of odd sizes. More on that in Replacing Floor Vents in an Old House.
"My opening is between sizes." What now?
Slightly over a stock size (e.g. 4-1/8 × 10)
A stock 4×10 may still drop in if the extra is on one rough edge. It may sit a little loose.
Slightly under a stock size (e.g. 3-7/8 × 10)
A stock 4×10 body probably won't drop in. Your choices are trimming the opening (permanent) or going custom.
Clearly in between or an unusual shape
This is where a custom register makes sense. See Odd-Size Floor Vent Replacement for all your options.
When a custom 3D printed register makes sense
Our Custom Size Floor Vent Register is made from a few key dimensions you send. We adjust the model to your opening, print it, and ship it.
- Starts at $35
- Black, white, any color you choose, or glow-in-the-dark
- About 1–2 weeks of production. Need it faster? Contact us.
- Size range: up to 6" wide, no set length limit; best at 16" long or less (longer is case by case)
It's plastic, so it will likely be weaker than metal, and we don't recommend direct loading. It's best for odd-size openings in lower-traffic spots. For large openings or walkways, choose metal.
Supply vs. return: does size matter?
Supply registers blow conditioned air into the room. Return grilles pull air back to the system and are often larger. Covering or undersizing a vent can restrict airflow, so replace a vent with one that fits the opening fully and keeps its open area clear. Our registers are designed as floor supply vents, but we can make one for a return too.
FAQ
What is the most common floor vent size? 4×10 is one of the most common residential sizes, along with 4×12, 2×12, and 6×10.
Is the size the faceplate or the hole? The hole (duct opening). The faceplate is always larger.
Can you make any size? Up to 6" wide, with no set length limit; best results at 16" long or less. Send measurements to the nearest 1/16".
Does a custom register come with a damper? No. We don't offer dampers or louvers.
Find your size, or have one made
Measure your opening first. If it's a common size, grab a stock register. If it isn't, order a custom-size floor register or ask us a question.
Related:
Can’t Find a Floor Vent That Fits? Odd-Size Floor Vent Replacement Options
You pull up a broken floor register, take it to the hardware store, and nothing on the shelf matches. If that sounds familiar, you're not alone.
Why your floor vent isn't a "standard" size
There's no single universal floor register size. Common sizes such as 4×10, 4×12, 2×12, 6×10, and 6×12 are what stores stock. But many homes have openings that don't match:
- Older homes often had ductwork cut to sizes that predate today's common stock sizes.
- Renovations and new flooring often mean openings get recut, shifted, or trimmed.
- Custom or modified HVAC work can leave openings at whatever size fit the job.
- Damage over time: chipped edges and swollen subfloor change the usable opening.
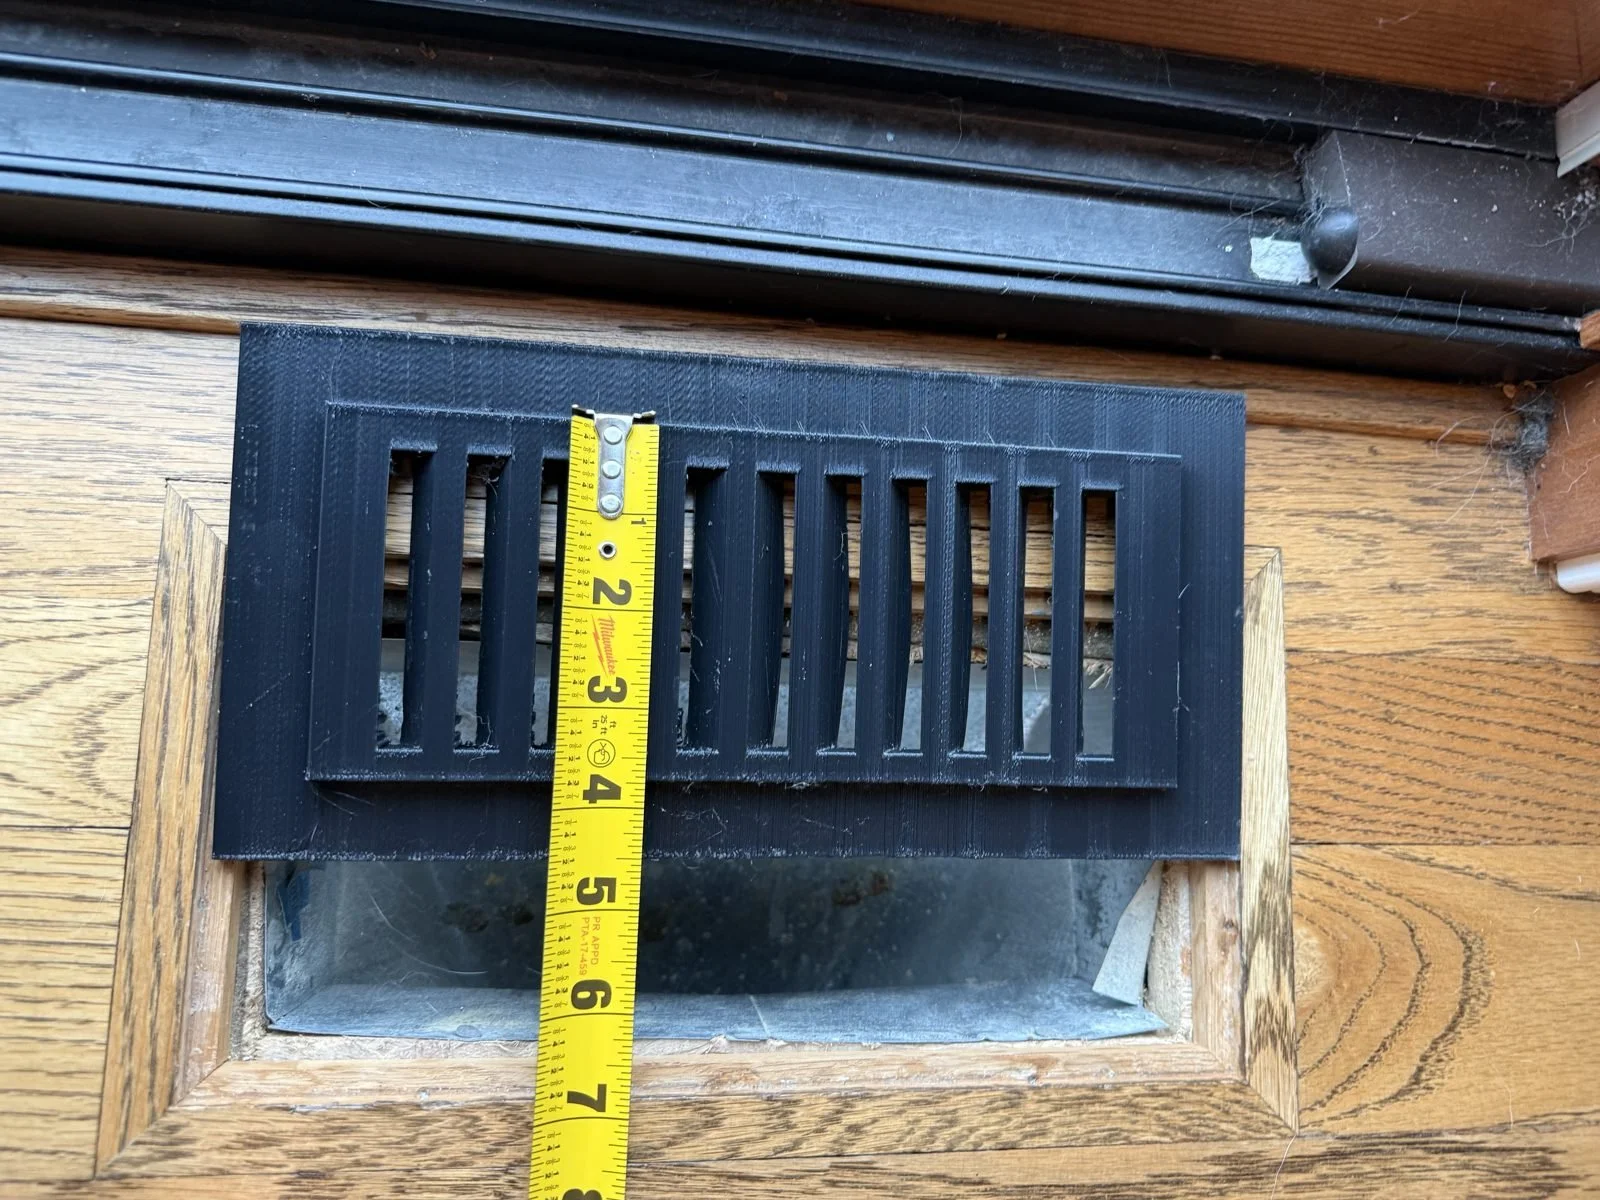
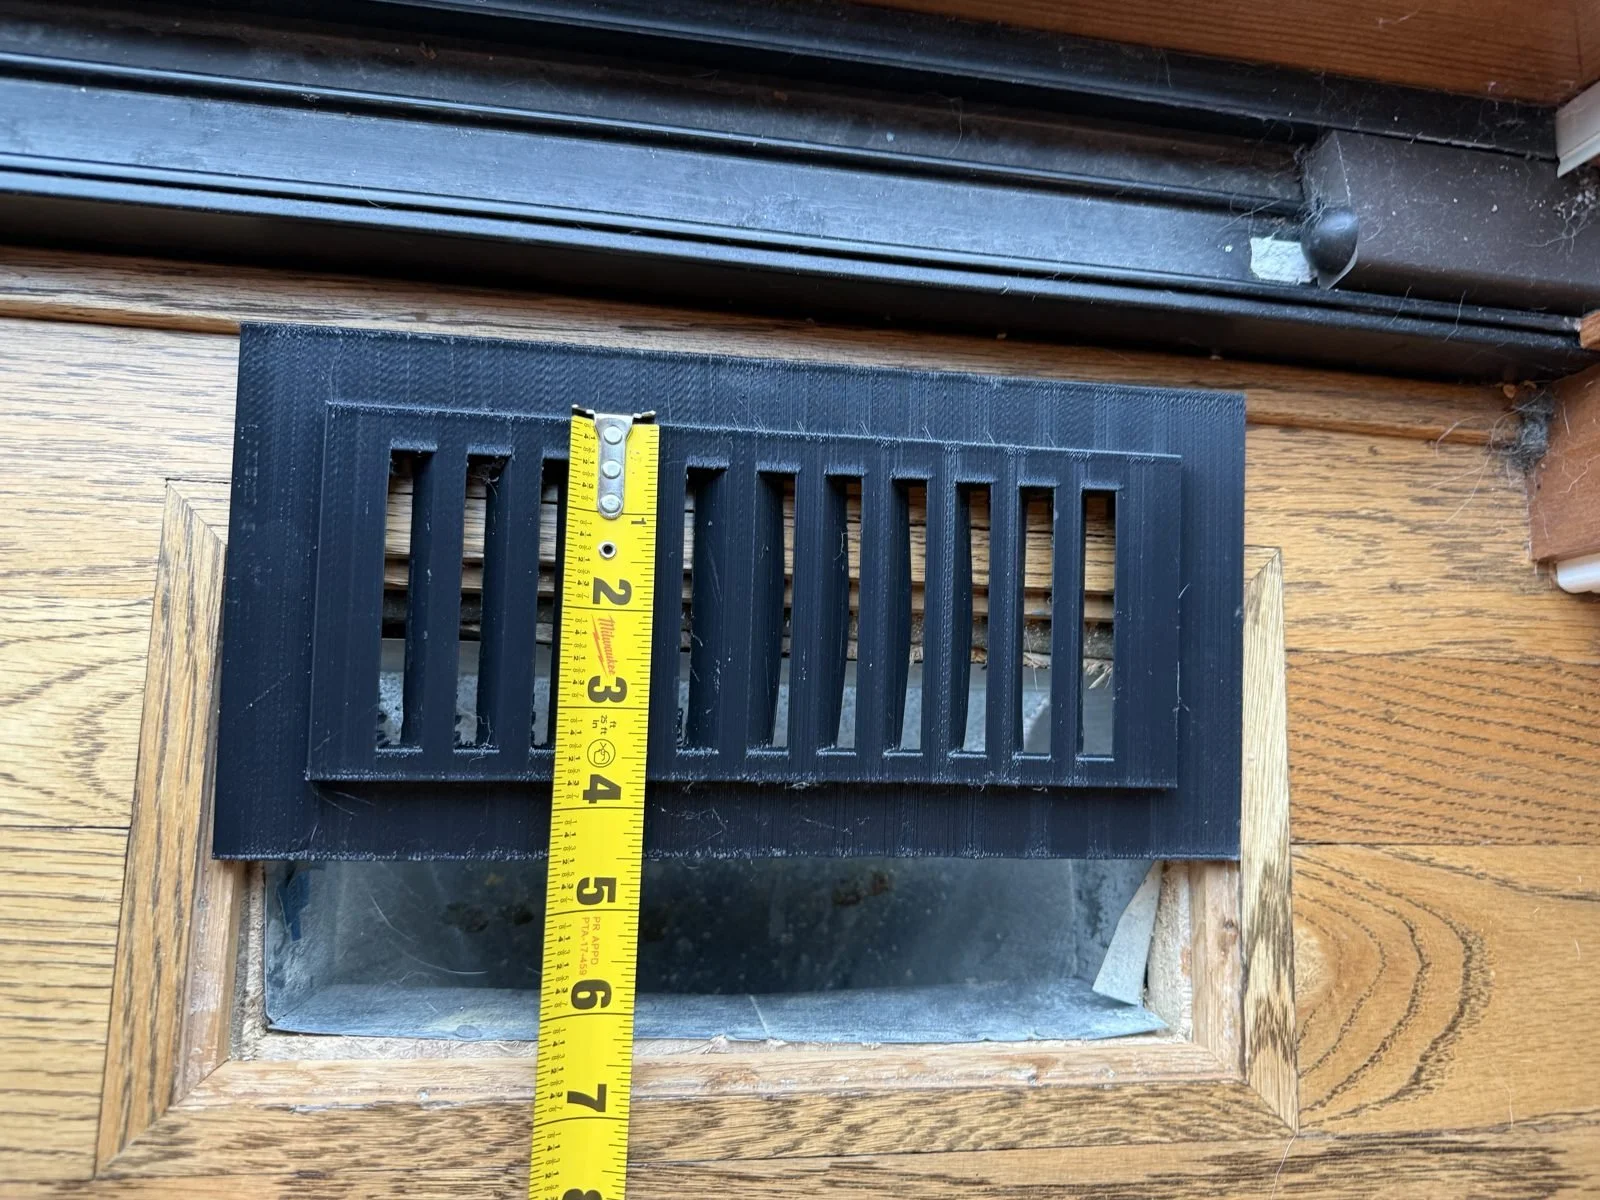
A difference of even 1/4" can stop a stock register from dropping in, or leave it rattling loose.
Your options for an odd-size opening
Option 1: Find the nearest stock size and adapt
If your opening is only slightly off, a stock register sometimes works with a little trimming of the opening or shimming. This is the cheapest route when it works, but cutting floors is permanent and not always possible with tile or hardwood.
Option 2: Custom metal or wood registers
Specialty manufacturers make metal and wood registers to custom sizes. These are strong and suitable for walk-on areas. Custom orders typically take several weeks, and prices vary widely by size and material. For large openings or vents in walkways, this is usually the right choice.
Option 3: A custom-size 3D printed register
This is what we make. You send us a few key dimensions, we update our model to fit your opening, print it, and ship it. It works well when:
- Your opening is an odd size that stores don't stock
- The vent is in a lower-traffic spot (along a wall, under a table, beside furniture)
- You want a color beyond basic metal or wood finishes: black, white, or a color you choose, including glow-in-the-dark
- You'd like it made in about 1–2 weeks of production time
When a 3D printed register is NOT the right choice
Be honest with yourself about where the vent is. Our product page says it plainly: because it's plastic, it will likely be weaker than other materials, and we don't recommend direct loading. If people will regularly step directly on the register, or the opening is large enough that a foot could go through, choose a metal register. Our registers max out at 6" wide and work best at 16" long or less.
How our custom-size floor register works
- Measure your opening. Follow our step-by-step measuring guide.
- Choose a color: black, white, any custom color, or glow-in-the-dark. In-stock colors start printing right away; others are ordered, then printed.
- Send your key dimensions with your order: the vent cut-out width × length, plus the recessed pocket dimensions if your vent sits flush, all to the nearest 1/16".
- We update the model to your numbers and print it.
- We ship it. Production takes about 1–2 weeks. Need it sooner? Contact us.
Pricing starts at $35 and varies with the cost of the plastic.
Tips for getting the fit right the first time
- Measure the duct opening, not the old cover.
- Measure each direction twice, and send the smaller number.
- Send photos of the opening and the old register.
- Mention anything unusual: rounded corners, a nearby floor transition, or a tight space under the floor.
FAQ
Is a custom-size register more expensive than a stock one? Usually, yes. A stock register in a common size is hard to beat on price. Custom makes sense when no stock size fits.
What material is it? 3D printed PLA plastic. It should handle the air that typical home floor supply vents put out.
Can I walk on it? We don't recommend direct loading. Place it where it won't take regular foot traffic, or choose metal for walkways.
Do you make wall or ceiling vents? Right now we make floor vents only. If you need a wall, ceiling, or toe-kick vent, reach out and we'll see what we can do.
Can I return it if it doesn't fit? No. Every register is custom-made, so we don't accept returns. Measure carefully, and send photos if you're unsure.
Get a vent that actually fits
Order a custom-size floor vent register, starting at $35. Not sure your opening is a good candidate? Send us a photo and your measurements.
Related:
How to Measure a Floor Register (and What to Send Us for a Custom Size)
Buying a new floor register looks simple until the new one doesn't fit. The most common reason is measuring the wrong thing.
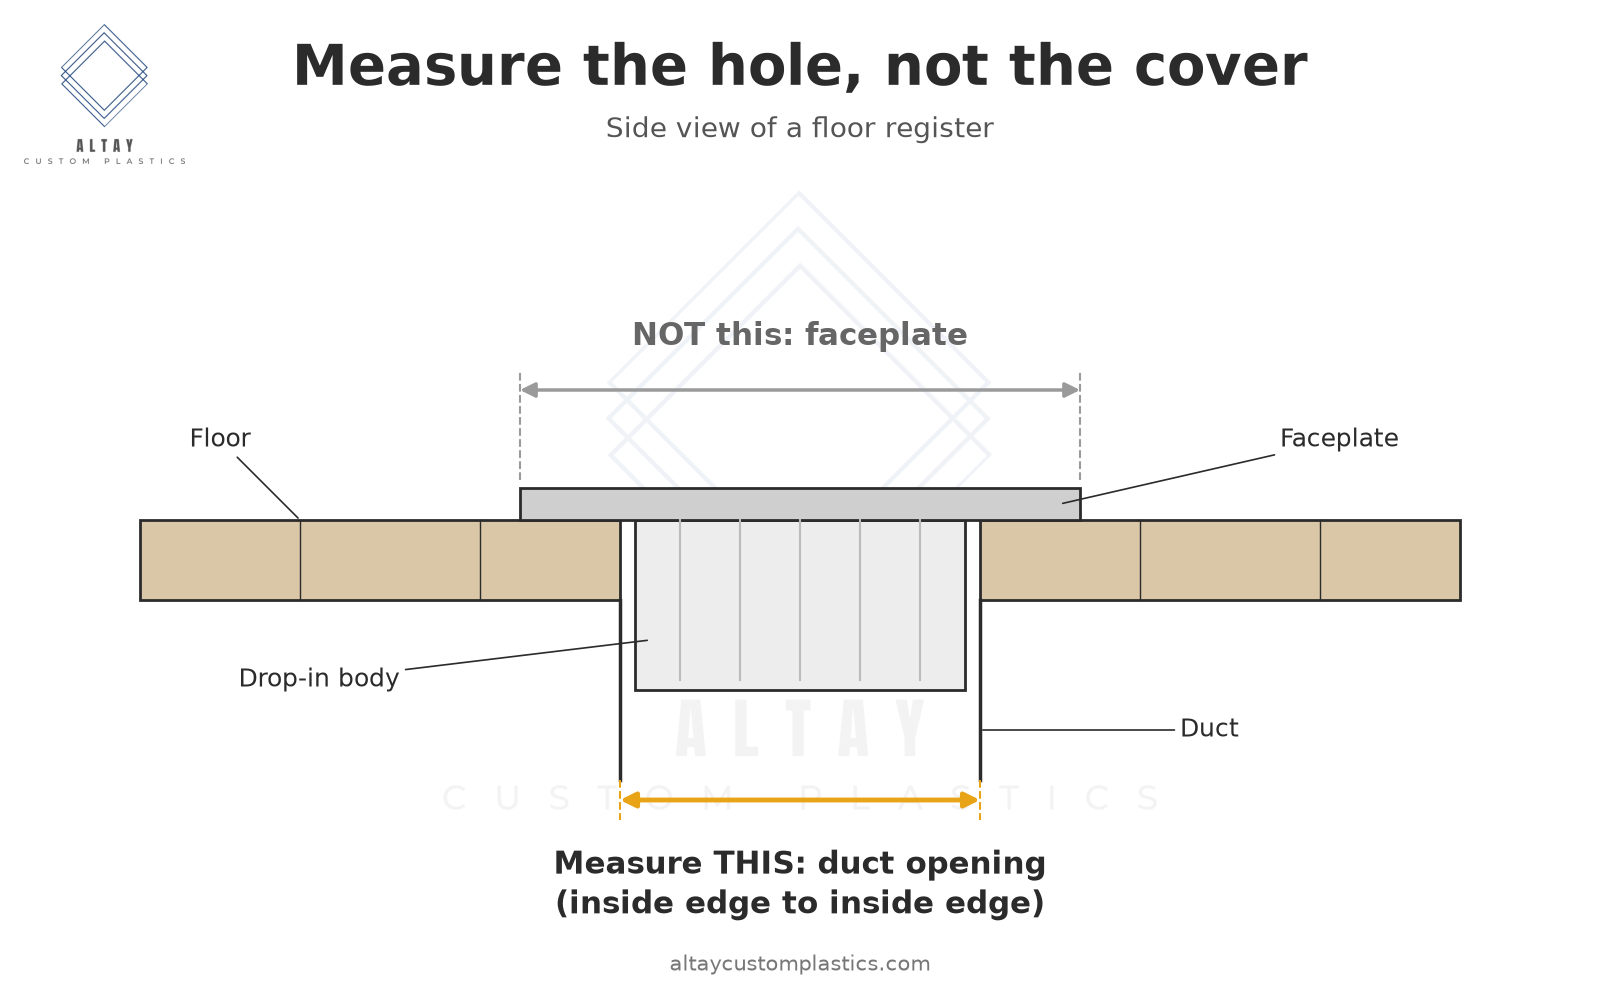
The golden rule: measure the hole, not the cover
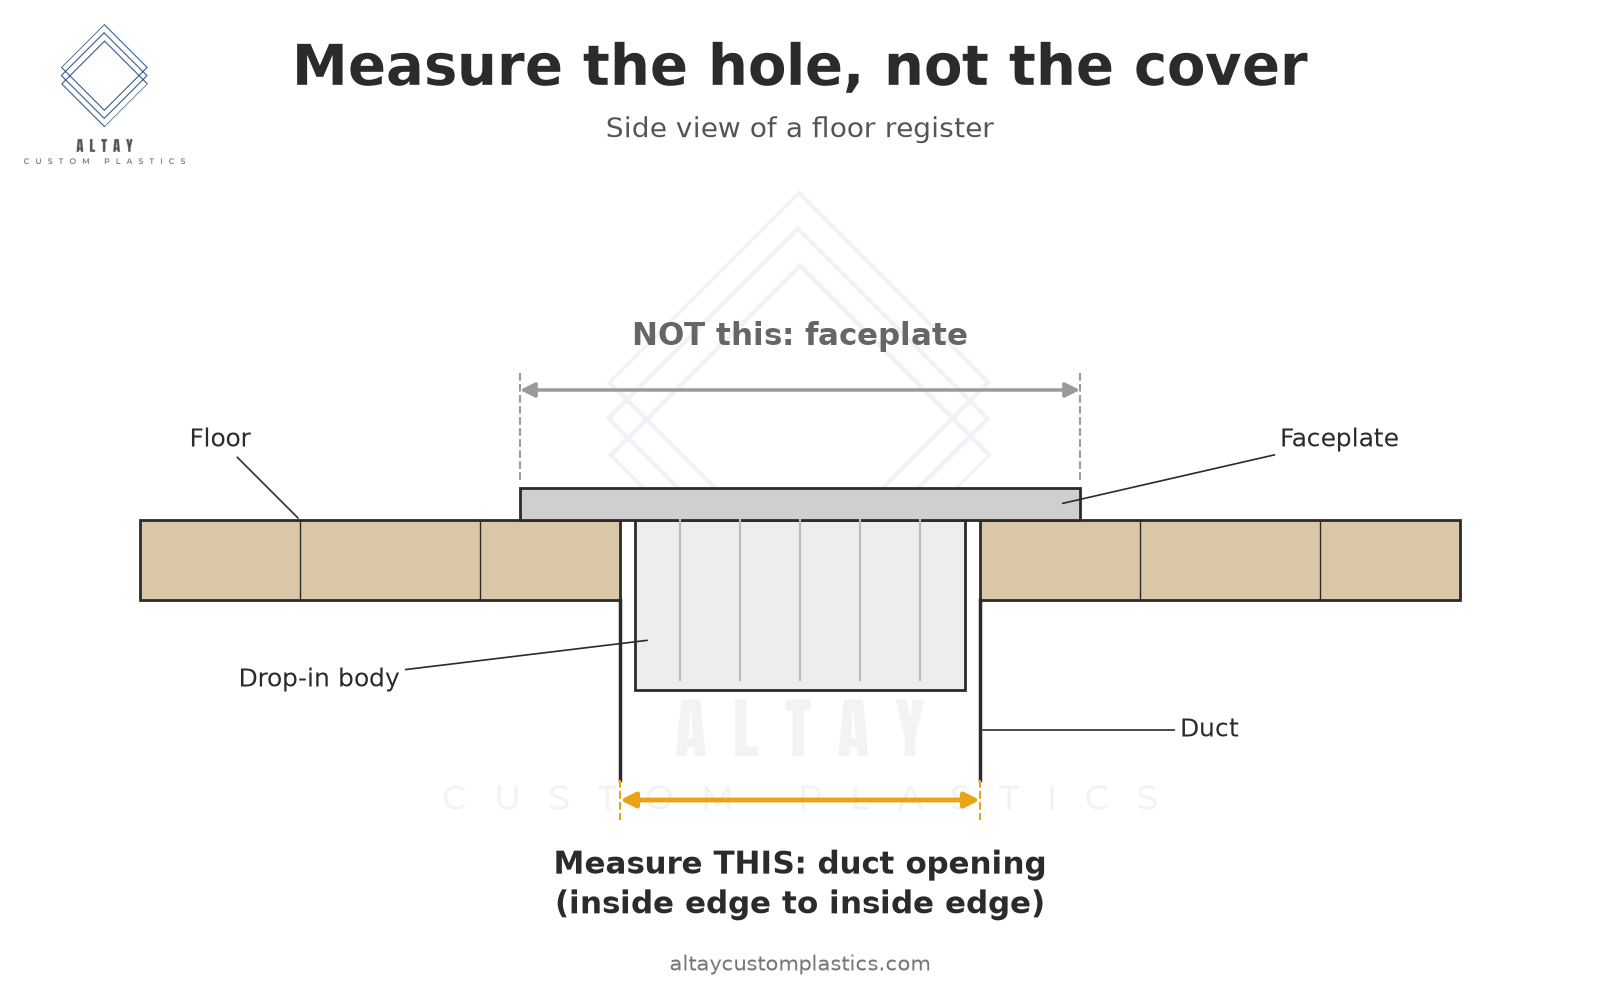
Floor registers are sized by the duct opening, the hole in the floor that the register drops into. They are not sized by the decorative faceplate you see from above. The faceplate always overlaps the floor around the hole, so it's larger than the register's nominal size. A "4×10" register fits a hole about 4" × 10"; its faceplate is noticeably bigger.
If you measure the top of your old cover, you'll usually come out roughly a size too big, and the new register won't drop in.
What you'll need
- A tape measure or ruler that reads to 1/16"
- A flashlight
- A pencil and paper (or your phone's camera)
- A screwdriver, if your register is screwed down
Step-by-step: measuring a floor register
Step 1: Remove the old register
Most floor registers lift straight out. Some are held with screws through the faceplate. Take those out first. Set the old register aside; you'll want it later.
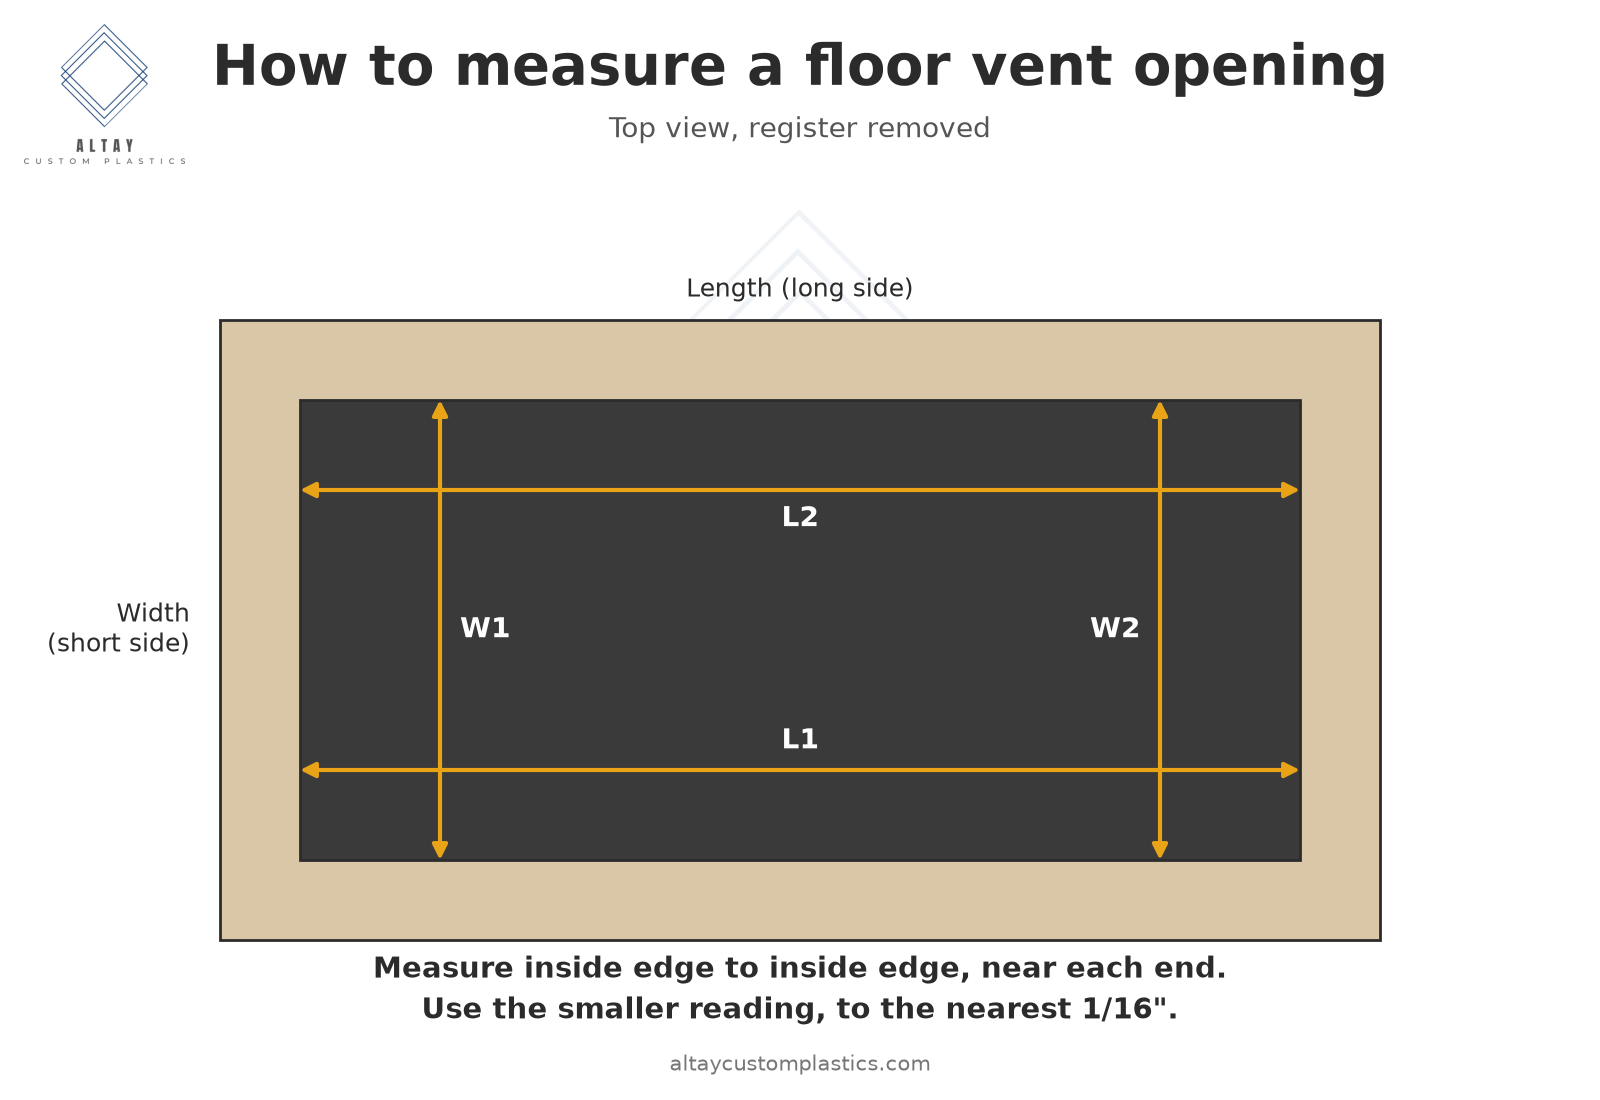
Step 2: Measure the width of the opening
Measure the short side of the hole, from inside edge to inside edge. Older openings are often not perfectly square, so measure in two places (near each end) and write down both readings.
Step 3: Measure the length of the opening
Measure the long side the same way, in two places.
Step 4: Use the smaller readings
If your two readings differ, use the smaller number. A register sized to the smaller dimension will still drop in. One sized to the larger dimension may bind.
Step 5: Check whether your vent sits flush
Most registers rest on top of the floor. Some sit flush, dropped into a recessed pocket cut into the floor around the hole. If yours is flush, also measure the width, length, and depth of that recessed pocket. If your register sits on top of the floor, you can skip this step.
Step 6: Measure the old register too (as a cross-check)
With the old register upside down, measure:
- The drop-in body: the part that goes into the hole
- The faceplate: the outer flange that sits on the floor
These help confirm your opening measurement and show how much overlap looks right in your room.
Step 7: Take photos
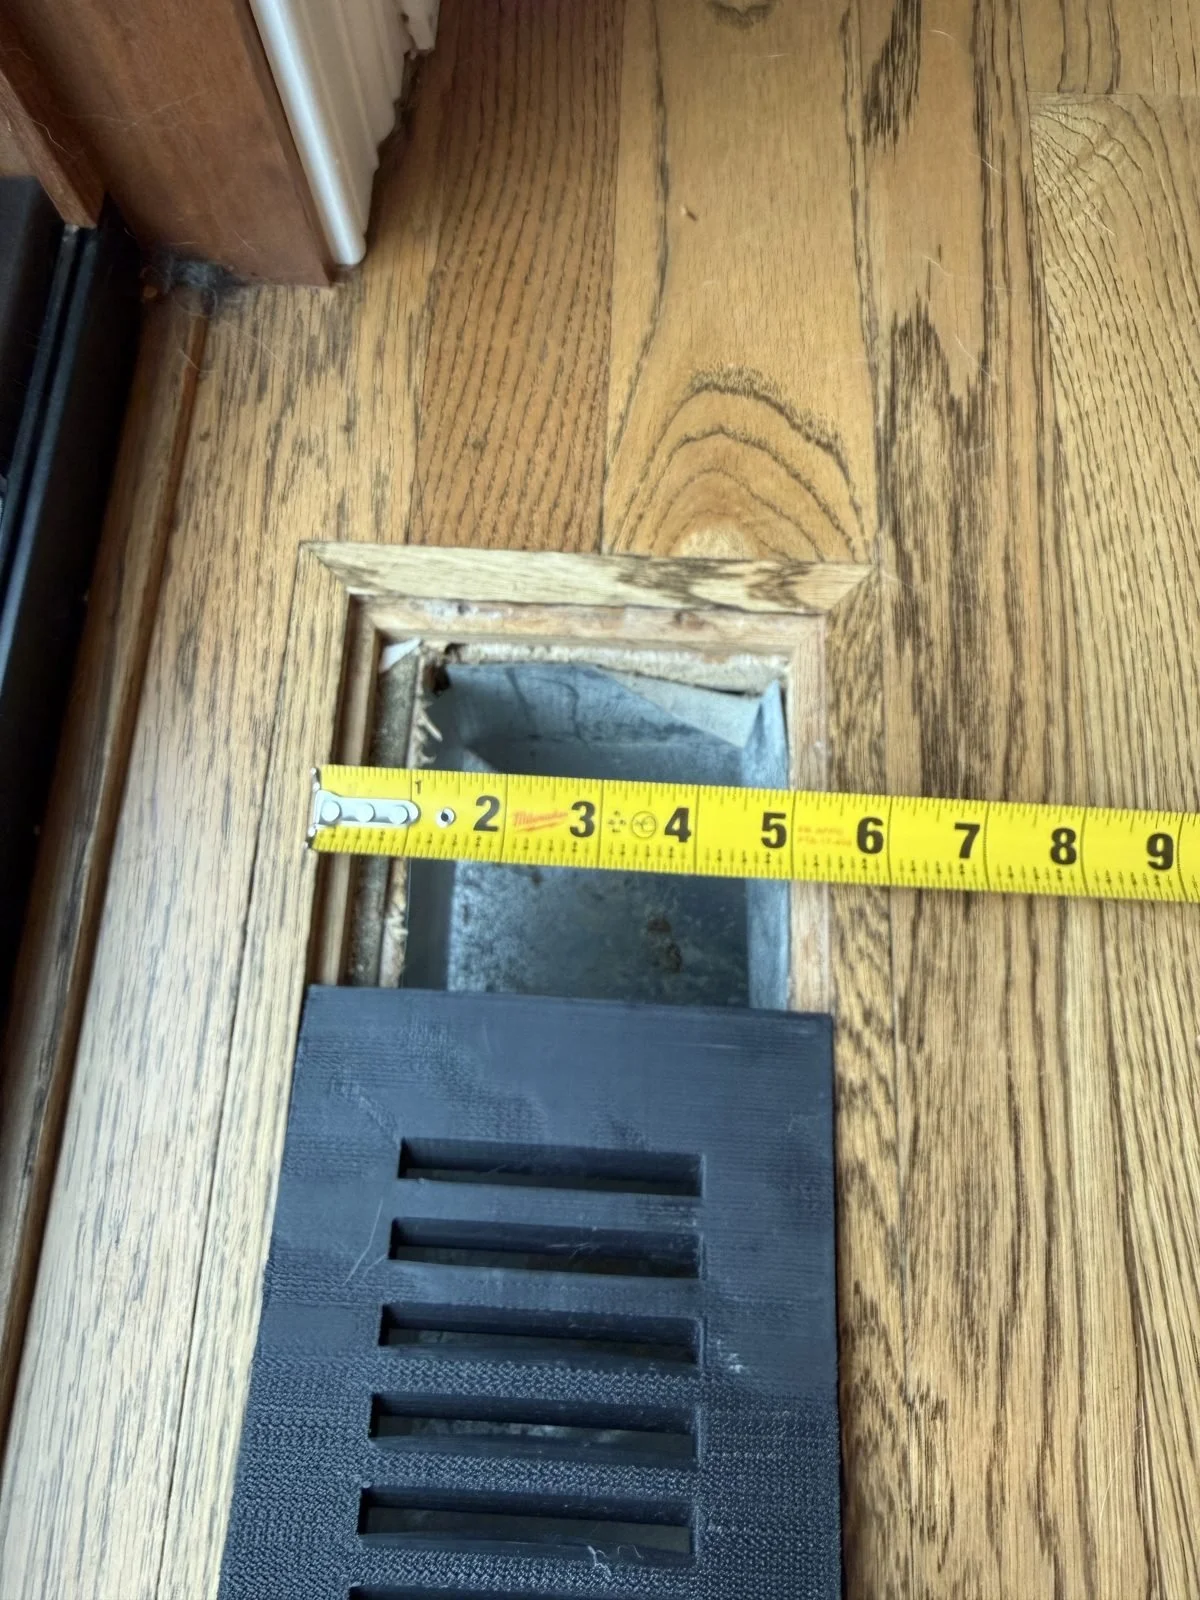
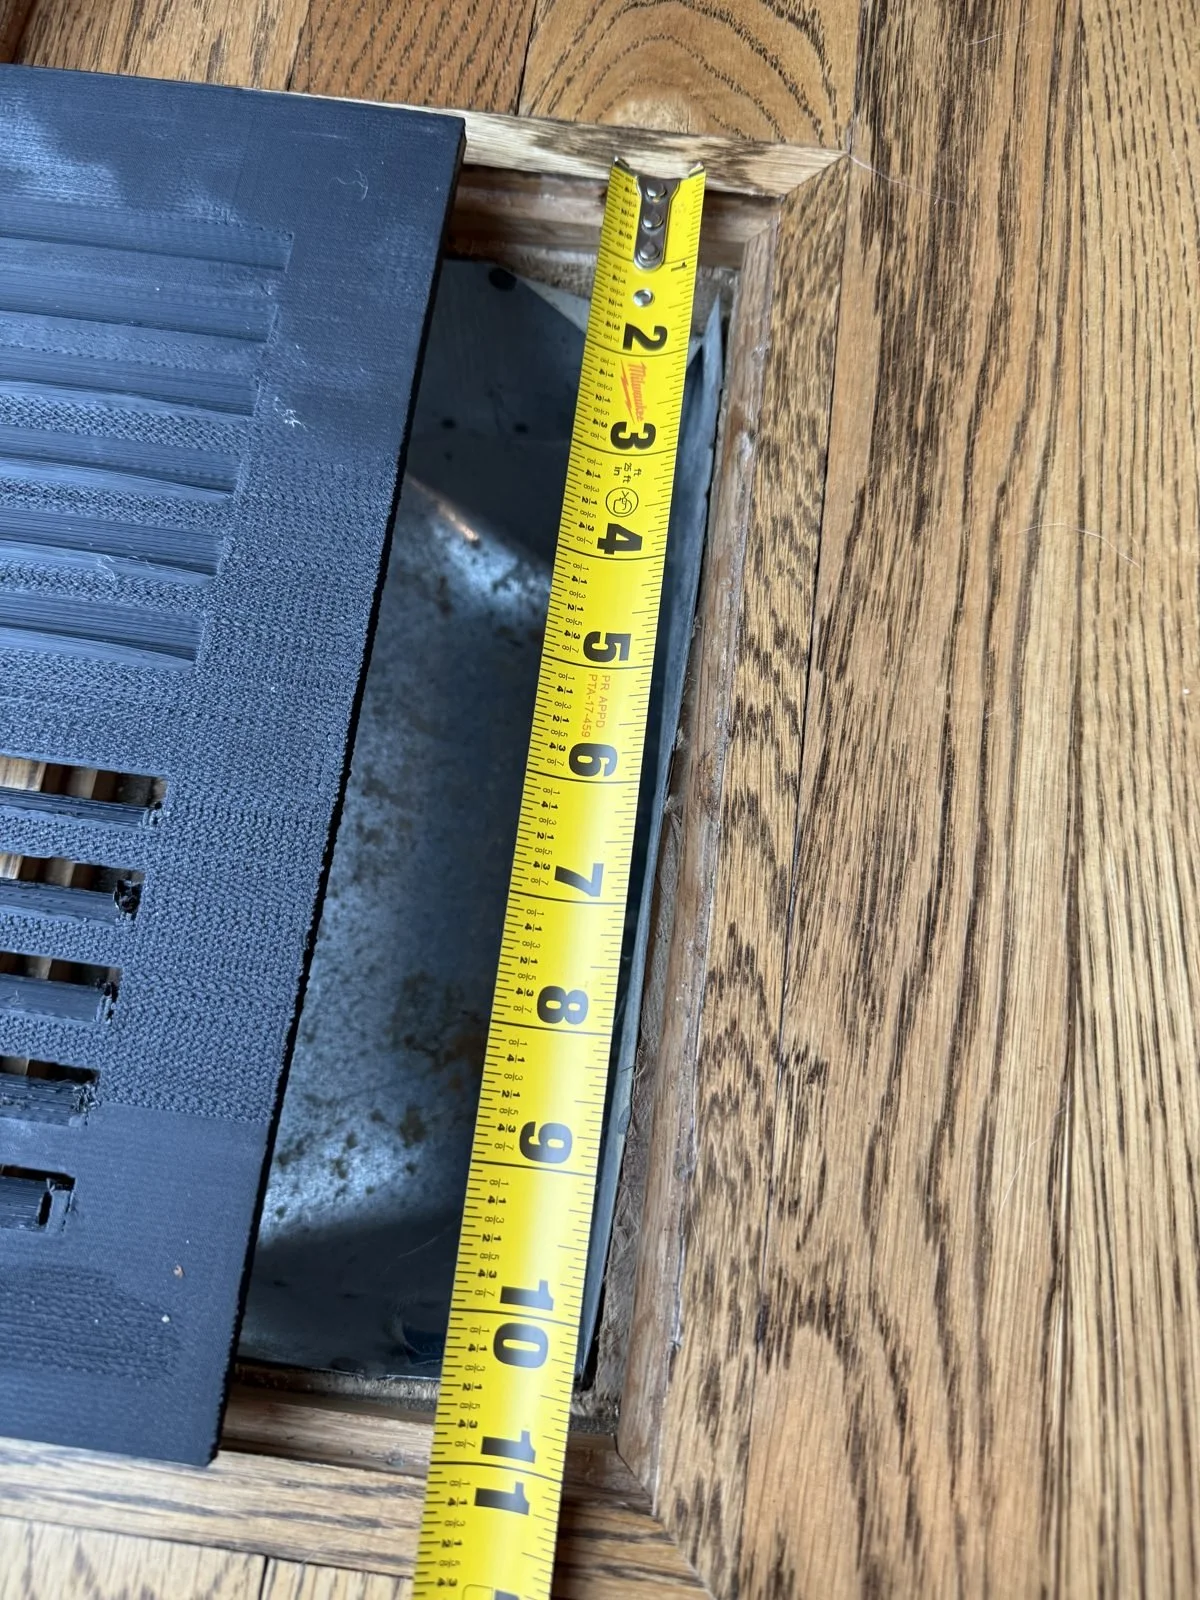
Take one photo straight down into the opening with the tape measure in frame, and one of the old register. Photos catch the details numbers miss: rounded corners, an off-center duct, or a floor transition next to the vent.
Common mistakes to avoid
- Measuring the faceplate instead of the hole. This is the number-one reason a new register doesn't fit.
- Trusting the size stamped on the old register. Openings get recut during flooring jobs, so the stamped size and the real hole may not match.
- Measuring only once. Old floors move, and openings drift out of square.
- Rounding up. If your opening is 3-7/8", don't call it 4". Send the actual number.
- Ignoring the floor surface. Thick carpet or a raised tile edge can change how a faceplate sits.
What to send us for a custom-size register
Our Custom Size Floor Vent Register is built from a few key dimensions you provide. We update the 3D model to your numbers, print it, and ship it. Please include:
- Vent cut-out width × length, measured inside edge to inside edge (smallest readings), to the nearest 1/16"
- Recessed pocket dimensions (flush vents only): if your vent sits flush in a recessed pocket, send the pocket's width, length, and depth, also to the nearest 1/16"
- Color: black, white, or any color you choose, including glow-in-the-dark
- Photos of the opening (with the tape measure visible) and of the old register
Our registers can be up to 6" wide, with no set length limit. They work best at 16" long or less; longer registers are case by case, so ask us first.
Production takes about 1–2 weeks because each register is made to order. If your color is in stock, we start printing right away; if not, we order the filament first, then print. If you need it sooner, reach out through our contact form.
Is a plastic register right for your spot?
Our registers are 3D printed in PLA plastic, which should handle the air that typical home floor supply vents put out. As noted on the product page, plastic will likely be weaker than metal or wood, and we don't recommend direct loading. A custom print is a great fit for odd-size openings along walls, under furniture overhangs, or in low-traffic areas. For large openings or vents in the middle of a walkway, where someone could step directly on the register, a metal register is the safer choice.
FAQ
Do I measure the old cover or the hole? The hole. The register size is the duct opening; the faceplate is always larger.
My opening is 4-1/8" × 10". Is that a 4×10? A stock 4×10 may fit if the extra 1/8" is on one rough edge. If you'd rather have a snug fit, send us your actual measurements and we'll size to them.
What size can you make? Up to 6" wide, with no set length limit. Best results are at 16" long or less; longer registers are case by case.
Can I return a custom-size register? No. Each register is custom-made to your measurements, so we can't accept returns. That's why it pays to measure carefully and send photos.
Does it include a damper? No. Our registers don't include dampers or louvers.
Ready to order?
Measure your opening, then order your custom-size floor register starting at $35. Questions about your measurements? Contact us with a photo and we'll help.
Related:
From CAD to Calibrated Stamp in Days, Not Weeks: 3D-Printed Dies for Rapid Stamping R&D
Validate stamping die geometry in days with 3D-printed tooling and AI-assisted parametric CAD. Rapid R&D for manufacturers before hard tooling.
When a manufacturer needs a new stamped part validated fast, before committing to hard tooling, the bottleneck is almost never the stamping itself. It's getting a die that's close enough to right to test against real specs, then iterating until it actually is right.
We recently ran exactly that process here at Altay Custom Plastics for a bimetal disc stamping application. A client needed a precise dent pressed into a metal disc to set a specific calibration point, and the part needed to hit tight dimensional targets before anyone would commit to production tooling for the new product.
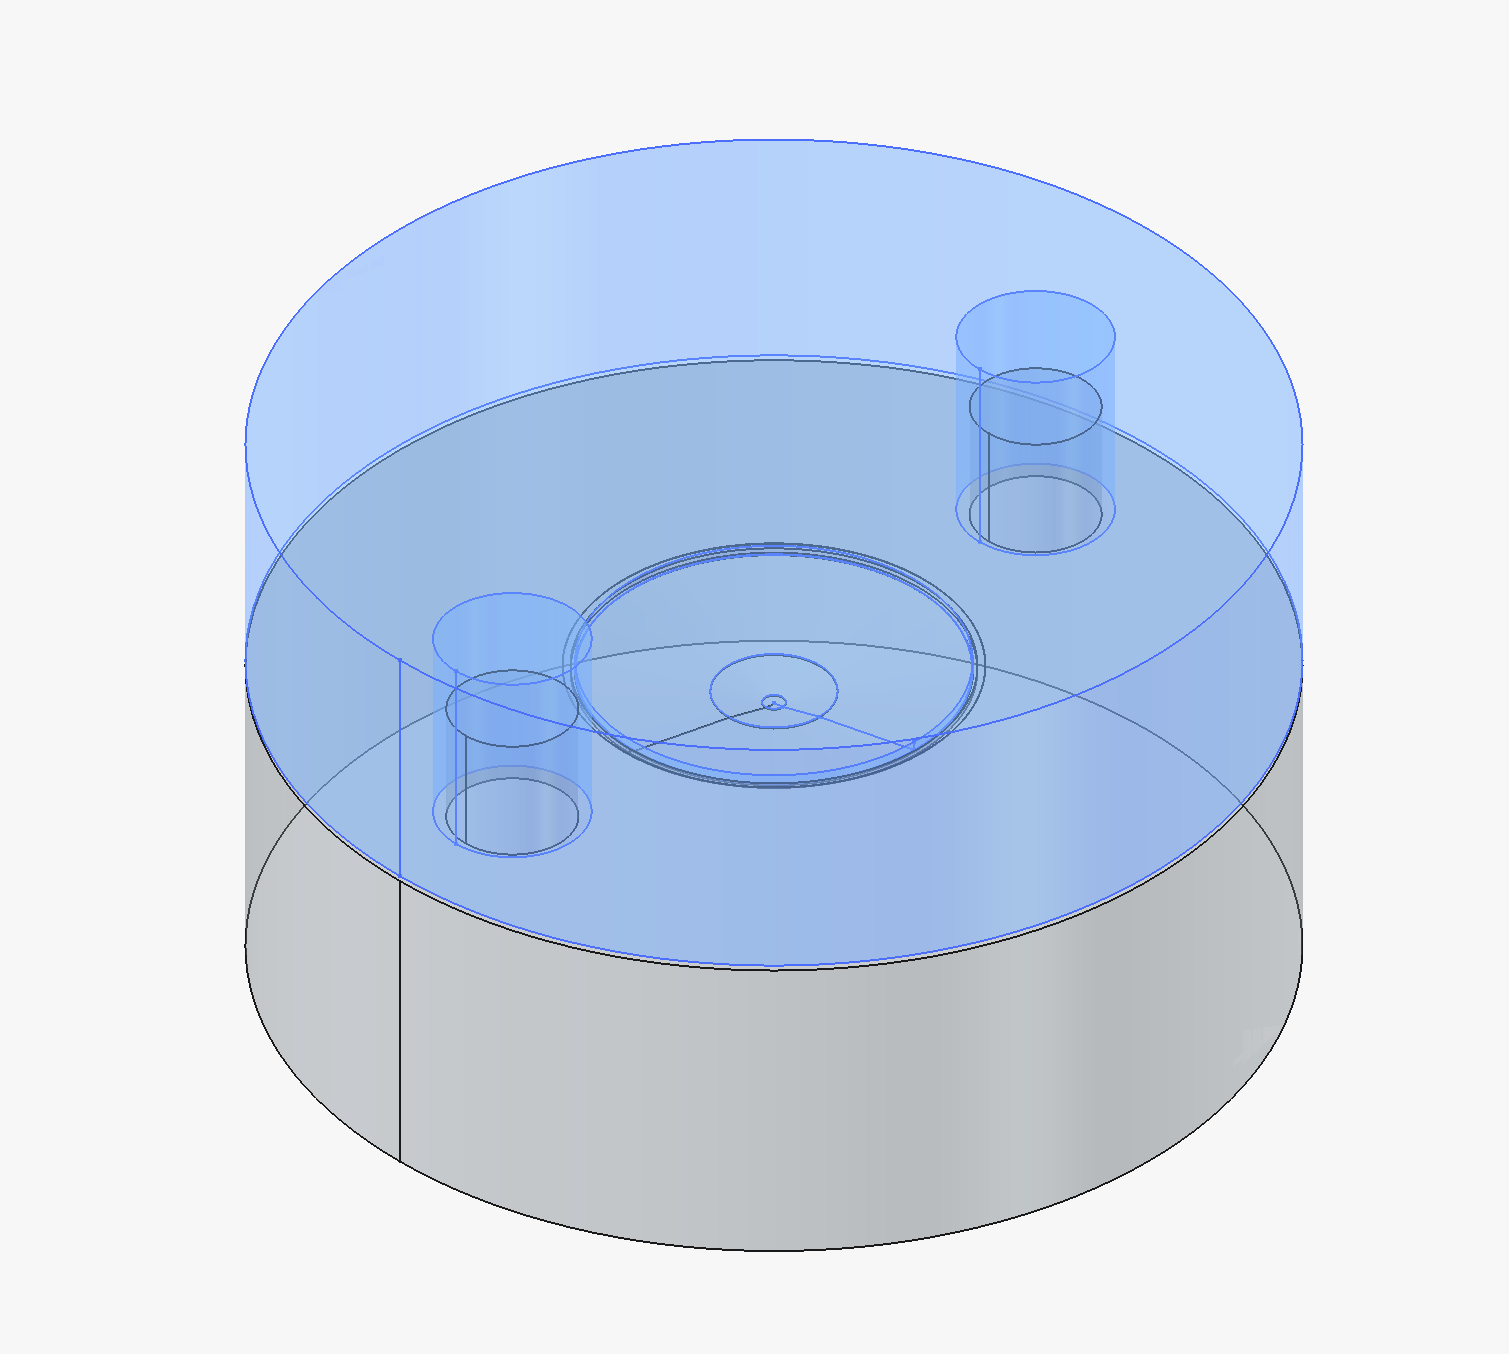
3D print of the first die and punch for denting the disc.
The Problem: Calibration Is a Moving Target Until You've Tested It
The part in question, a thin bimetal disc, needed a dent stamped into it with a very specific depth and curvature. Get that geometry even slightly wrong, and the part's calibration point shifts. On paper, you can calculate a target profile. In practice, real material springback, thickness tolerances, and press behavior mean the first "correct" design on your screen usually isn't correct on the bench.
That's a bad problem to solve with steel tooling. Cutting a new hardened die for every guess gets expensive and slow, and this was still R&D, not production.
What We Built: 3D-Printed Upper and Lower Dies
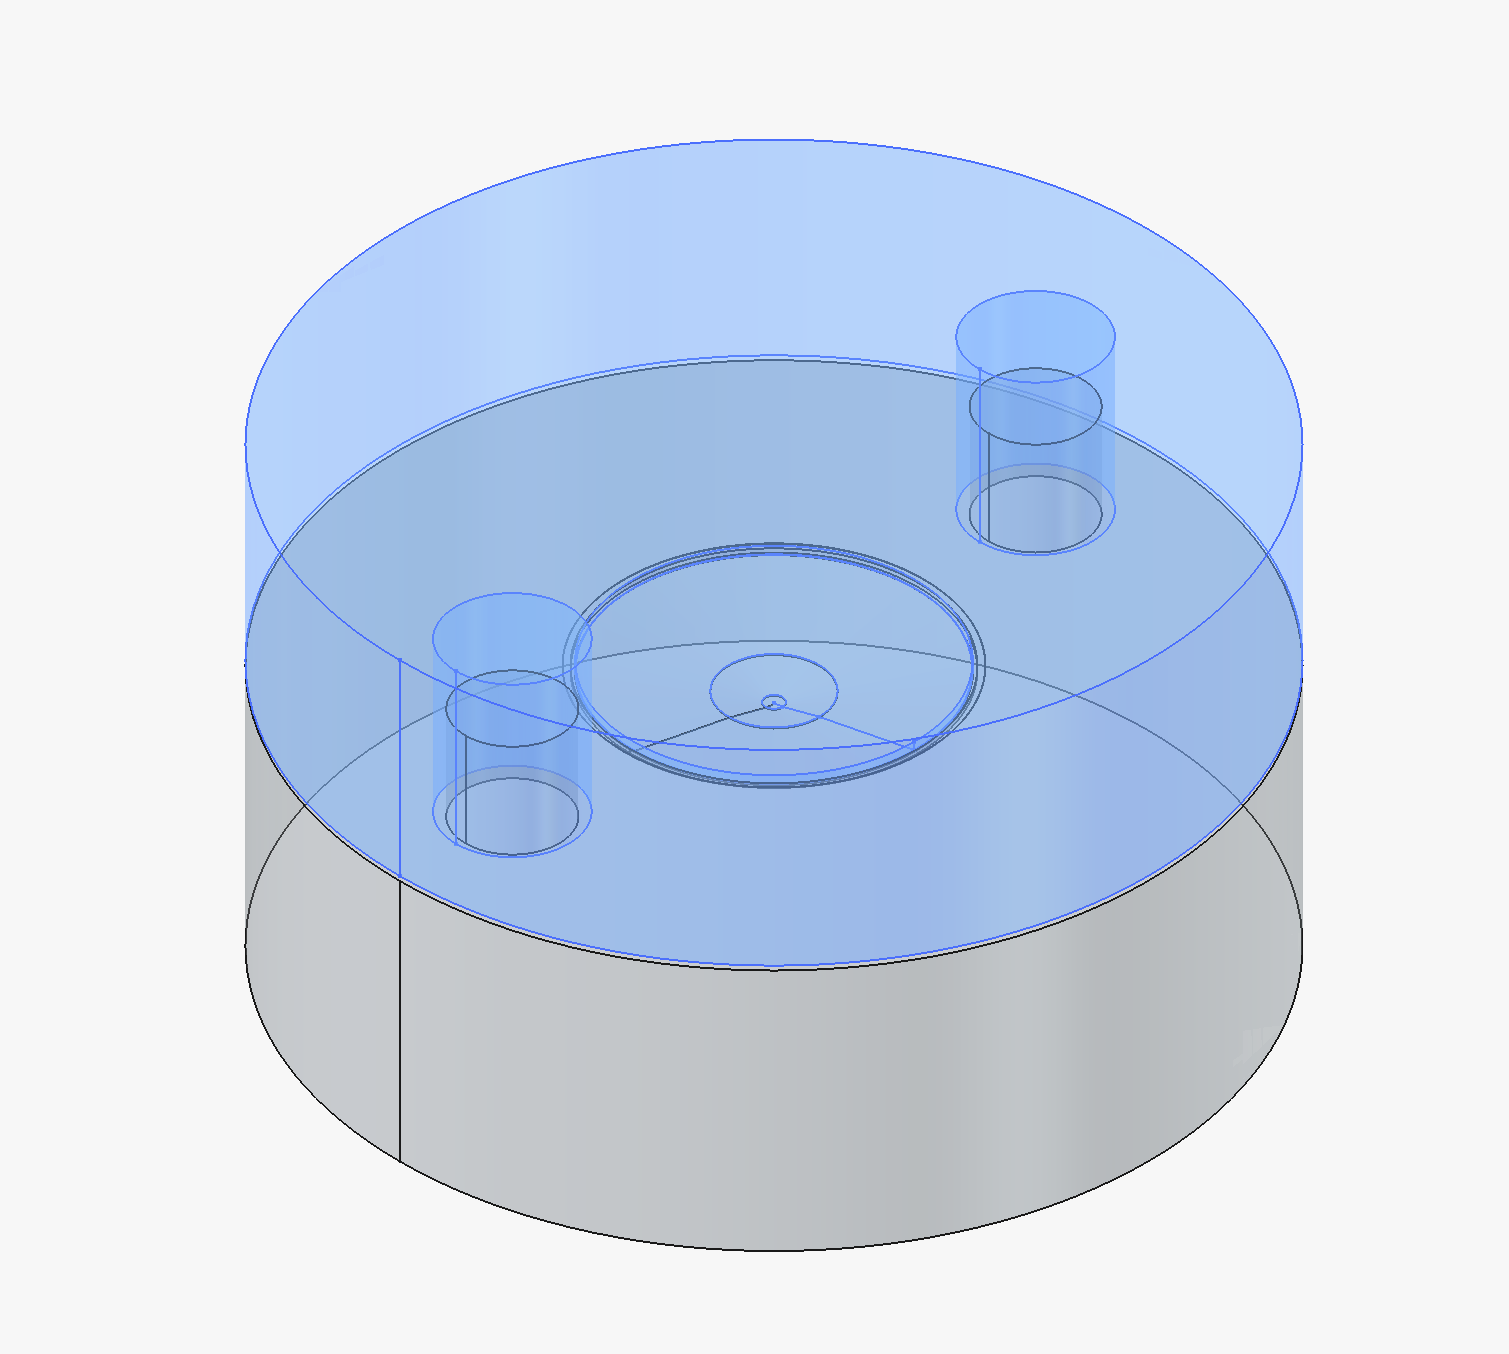
Instead of machining, we designed and 3D printed a matched upper punch and lower anvil, a full die set sized to dent the disc to the target dimensions. Because the dies were printed, we could press a test part, measure it, and adjust the model quickly.
It took two to three design iterations to land on final geometry, tuning dent depth, curvature radius, and clearance until the pressed part matched spec. Each iteration was a fast turnaround: adjust, print, press, measure, repeat. That loop is where a printed-die approach earns its keep. It turns "how do we know this geometry is right?" into a question you can answer empirically in an afternoon instead of a design review.
Where AI Fits In: Parametric CAD That Moves at the Speed of Iteration
The other piece that made the fast turnaround possible was how the CAD itself was built. Rather than modeling each die revision from scratch, we set the geometry up parametrically from the start. Disc diameter, dent curvature, contact diameter, springback allowance, and clearance are all driven from a single parameter set that regenerates the full die model on demand.
We're now integrating AI directly into that CAD workflow to push this further. Instead of manually reworking geometry every time a measurement comes back out of spec, we can describe what changed (for example, "the dent came out 0.003 inches shallow") and have the parametric model adjusted and regenerated in the same session. The initial CAD pass for a new die design also comes together dramatically faster with AI assistance handling the first-pass geometry and parameter setup, so more of the iteration budget goes toward testing real parts instead of redrawing them.
The result is a design-print-test loop tight enough to treat physical validation as a normal part of engineering a die, not an expensive exception.
Why This Matters for Manufacturers Bringing a New Product to Market
If you're a manufacturer trying to get a new stamped component to market ahead of competitors, this kind of R&D-stage die work solves a specific problem. You need confidence in your geometry before you spend on hard tooling, and you need it fast.
We offer this as a time-and-materials engineering service at Altay Custom Plastics: rapid 3D-printed die design and iteration to validate stamping geometry, dimensional targets, and calibration behavior before you commit to production dies. You get tested, dimensionally proven geometry, plus a parametric model that's ready to hand off to a toolmaker, instead of a best guess.
Other Ways This Approach Helps Manufacturing Customers
A few other angles where this kind of rapid, printed-die R&D pays off:
Bridge tooling for low-volume runs. If you need a few hundred parts to qualify a customer or run a pilot batch, a durable printed die set can sometimes produce short-run production parts directly, with no hard tooling investment until volume justifies it.
De-risking multi-vendor sourcing decisions. Prove out geometry and process parameters in-house before handing specs to a stamping vendor, so you're negotiating from validated data instead of a drawing.
Reverse-engineering and requalifying legacy tooling. When an old die is worn, lost, or undocumented, we can rebuild the geometry parametrically or from a sample part or drawing and validate it in printed form before cutting new steel.
Fast DFM feedback loop. Because iteration is cheap, we can hand design teams real dimensional feedback on their stamped-part geometry early, while changes still cost nothing but a reprint.
Competitive speed-to-market. In categories where being first with a validated part matters, cutting weeks out of the tooling-validation phase is a real competitive edge, not just a cost saving.
A parametric "digital twin" of the die. Every project leaves a live, adjustable CAD model of the tooling, not just a finished part, so future spec changes or new disc sizes can be re-validated in hours rather than starting over.
If you're developing a new stamped product and want to validate geometry before committing to production tooling, this is exactly the kind of engineering support we provide at Altay Custom Plastics. Get in touch and let's talk about your part.